
Miscellaneous

How to group Experiments into Projects?

There are several options:

  1. Use Categories for Experiments: they are defined by an Admin and are common to the Team.
  2. Use Tags/favorite Tags: User or Admin defined, depending on the Team settings (by default Users can create new Tags).
  3. Use a Resource of Category "Project" and the link system to link Experiments to that Project.
  4. Directly link Experiments together using the link system.

First, try to go beyond the nested, tree-like structure of hierarchical folders.

Imagine you have an Experiment which is:

  • about "Protein MR73"
  • using "Western blot"
  • an external collaboration
  • with "HEK cells"

Now if that Experiment was a file, you might want to store it in "Collaborations > Western Blot > MR73" maybe. Or "Project MR73 > Collaborations > HEK"?

But what if you have another one that is also using HEK cells but has nothing in common with the previous one. How would you go about looking for all the Experiments with HEK? And all the Experiments related to MR73 that involve a Western Blot?

In a traditional folder structure, you would need to search for it in almost each sub-folders.

Enter Tags.

Tags

Tags are a way to label your Experiments (and database objects) with defined keywords and you can have as many as you want!

tags-view.
Tags

Now with the Experiments correctly tagged, finding them through different search angles becomes easy! You can search for one Tag or many Tags directly from the main page.

Favorite Tags

Over time, you will have some Tags that become your favorites, as they are always the ones you look for for a set of Experiments.

Since version 4.2.0 it is possible to define "Favorite Tags" that will appear in the left pane of the page listing entries. It allows quick overview of related entries. You should try this feature, start by clicking the arrow on the left of the screen to toggle the left pane. Click the + button and start typing a Tag to add it to the list of Favorite Tags.

favtags
Favorite tags.

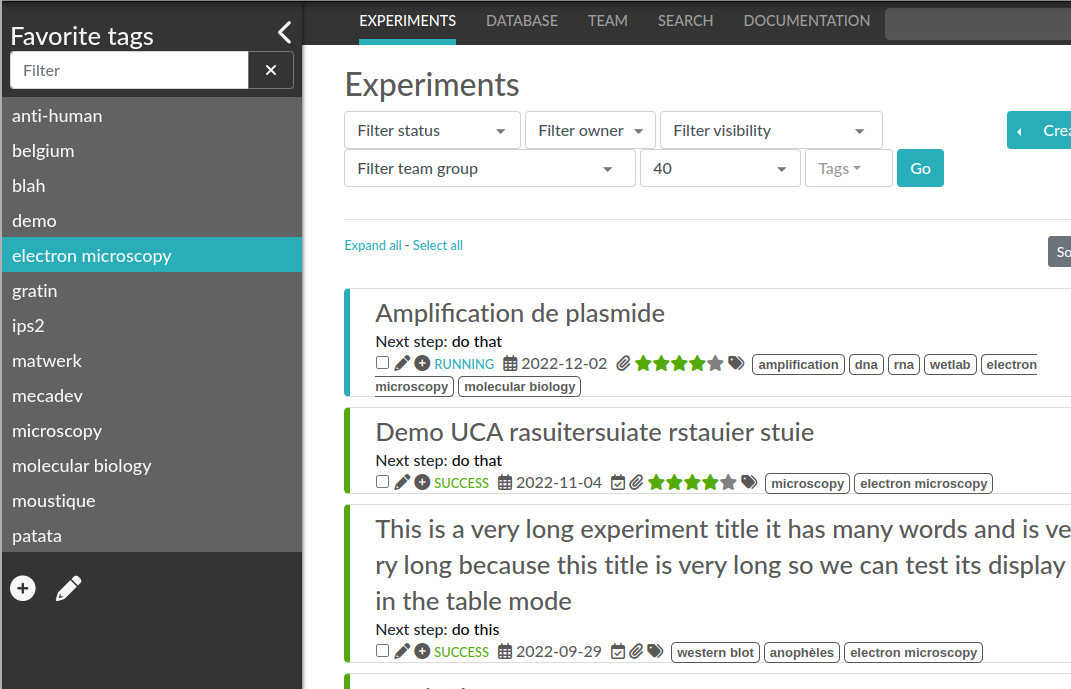
Note that if you use a "Favorite Tag" filter and then create an Experiment, it will be tagged automatically with that Tag.

Using Projects

There is also another way to group Experiments together, that you can use along with Tags. It's using a Resource of Category: Project.

Go to the Admin Panel and create a Resource Category: "Project". Go to the Resources tab and create a new "Project" entry describing a group of Experiments, a project. Go to the Experiments tab and create an Experiment. In the field "Linked Resources", type the name of the project and click on the autocompletion field appearing, and press enter (or click outside). This Experiment is now linked to the project. So you can easily go to the project description from the Experiment, but more importantly, you can from the Project entry, click the "Show related" icon (chainlink) and display all Experiments linked to this project!

Make sure to create Experiments templates that already link to that Project so the link will always be here when the Experiment is created by a User.

Using Categories

Among a Team, Users and Admins can define several Experiments Categories. It is a quick and easy way to group Experiments together.

Signatures

Signatures are important in many contexts, such as scientific research.

A signature can prove that this particular data has been approved by this particular human. It is a different concept than timestamping, which proves that this particular data existed at this particular time.

eLabFTW allows you to have three different types of signatures.

Handwritten signatures

In your Settings page, check the setting: "Enable french style signature block in PDF Export", from the "PDF Configuration" section of the "General" tab. Now, when you generate a PDF, there will be a dedicated section at the bottom to allow signatures of the author and an observer.

Simple signatures

In an authenticated application such as eLabFTW, where all Users are identified and vetted, a signature can be clicking a checkbox, leaving a comment, or performing an action such as locking an Experiment.

The level of trust you can associate to this action is reinforced by using multi-factor authentication.

Advanced cryptographic signatures

Since version 5.1, an advanced signature mechanism exists for eLabFTW. It uses the highly secure Ed25519 public-key signature system and is compatible with minisign <https://jedisct1.github.io/minisign/>_.

How does it work?

At a high level

Each User gets a key pair composed of a private and public key. The private key is protected by a passphrase. In order to sign a document, the User provides their passphrase, and the document is cryptographically signed. The signature file is stored alongside the public key and the document being signed. This "Signature archive" also contains a small shell script to verify the signature with minisign.

Before the signature, a meaning is selected (Review, Approval, etc...). The signature involves several actions:

  • the cryptographic signature file is created: it signs the data
  • this file is stored in an archived zip file (as an attachment to the entry)
  • an immutable comment is created, to indicate that a signature occurred

If one bit of the document is modified, the signature won't be valid anymore. This verification can be done at any point in time and doesn't require access to any external service.

The important aspect is the level of trust you can have on the association of a key pair and a particular human. If you can verify that a particular human owns a given private key, then the signature verification done with its public part can be trusted fully.

Low level overview

warning

This section is for cryptonerds!

We use Ed25519 to create a keypair. We also generate 8 bytes of random bits to have the key id, along with a salt that is SODIUM_CRYPTO_PWHASH_SCRYPTSALSA208SHA256_SALTBYTES long.

We also make a checksum using Blake2 of the signature algorithm, the key id, and the private key. The salt is combined to the passphrase into a Key Derivation Function (KDF): this allows us to derive a key from that passphrase, and we will use it to XOR the key id, the private key, and the checksum. The Key Derivation Function (KDF) is using scrypt (sodium_crypto_pwhash_scryptsalsa208sha256).

To save this into a human readable format, the private key is serialized into the minisign format::

    untrusted comment: <arbitrary text>
base64(<signature_algorithm> || <kdf_algorithm> || <cksum_algorithm> ||
<kdf_salt> || <kdf_opslimit> || <kdf_memlimit> || <keynum_sk>)

And the public key::

    untrusted comment: <arbitrary text>
base64(<signature_algorithm> || <key_id> || <public_key>)

The private and public keys are stored under this form in the MySQL database, attached to a particular User.

For signature, we extract the private key thanks to the provided passphrase and create a detached signature of the hash of the message (the message being a full json export of en entry here). This is the pre-hashed version of Ed25519: Ed25519ph (see RFC8032 Section 5.1).

We add a trusted comment to the signature data. This comment is trusted because we can verify it with its signature. It is a JSON string with metadata about the signature (who, when, why). A signature file can look like this::

    untrusted comment: <arbitrary text>
base64(<signature_algorithm> || <key_id> || <signature>)
trusted_comment: <arbitrary text>
base64(<global_signature>)

A real-world example:

    untrusted comment: elabftw/50100: signature from key f3690b6554b4f817
RUTzaQtlVLT4F5C81w4VBNIodngF4Kna0RqfOTY3CGIB+6AlzsFeX2BPpm49HyIKVnZHHhUQ8C/osp/uTyhAo0WrCoASqm2d0w0=
trusted comment: {"firstname":"Toto","lastname":"Le sysadmin","email":"toto@yopmail.com","created_at":"2024-03-18T00:48:39+01:00","site_url":"https:\/\/elab.local:3148","created_by":"eLabFTW 50100","meaning":"Approval"}
LvN7bwKzaU3GwjJtEou1aZs2F4jeBJl5kQcblNSmW1mbZlBzL7h0RqfvDZeeIvBS3g6cfnybQAP93QzVFrlfBA==

As you can see, we mention the eLabFTW version and the key id, this is simply a hint about which key has been used (we cannot trust this piece of information).

But the third line can be trusted, and it contains the metadata.

Then we bundle:

  • the message (data.json)
  • the signature file (data.json.sig)
  • the public key (key.pub)
  • a shell script to verify the signature (verify.sh)

The shell script uses minisign to verify the data and the signature, allowing anyone to independently verify a signature made by eLabFTW without a need from external tools other than minisign.

This is stored in an immutable .zip file, and an immutable comment is added to the entity to make the action more visible.

signify from OpenBSD was also considered, and it uses roughly the same format, but doesn't support trusted comments which is a very useful feature.

Tracking changes

In eLabFTW, changes are tracked with a different granularity depending on the instance configuration and the type of change.

For an Experiment or Resource, there are two concepts: the Changelog, and the Revisions. The Revisions only tracks changes of the Main text (body) of the entry. The Changelog tracks all changes, except the content of the main text, as this is handled separately by the Revisions system.

You can access the Changelog or the Revisions through the ellipsis menu (three dots) in the top right of the page for an entry. The Revisions page allows you to compare two versions or restore a particular version of the entry.

All administrative changes, such as creating a new User, promoting a User to Admin, assigning a User in a team, and changing an instance parameter are logged in the Audit logs database table, and visible to the Sysadmin from the Audit Logs tab in Sysconfig panel.

Soft delete mechanism

eLabFTW uses a soft-delete mechanism for entries. When you delete an experiment, a resource, an attached file or a template, it is simply marked as being deleted: its State changes from Normal to Deleted (another possible State would be Archived). This means the entry will still be accessible in the backend database as a deleted entity, or through listing Deleted entries using advanced filters (State).

Entries can be restored by accessing them directly.

Sharing with external collaborators

If you want to share your results with an external collaborator, you have a few options:

Option 1: Export and send

This option is pretty straightforward, you export your entry into a PDF or ZIP archive and send this by email or other means to your collaborator.

If course, this option has its limitations, and is not always the best suited approach, but works 100% of the time.

Option 2: Allow anonymous access

It is possible to allow Anonymous access to an eLabFTW installation, but this functionality is disabled by default. The Sysadmin must check this parameter from the Sysconfig Panel:

sysconfig-anonymous
Registration and authentication configuration (Sysadmin panel).

Then, Users will have the possibility to generate a link with an access key in its URL, from the Visibility permissions window of an entry, near the bottom:

user-anonymous-link
Link generation by a user.

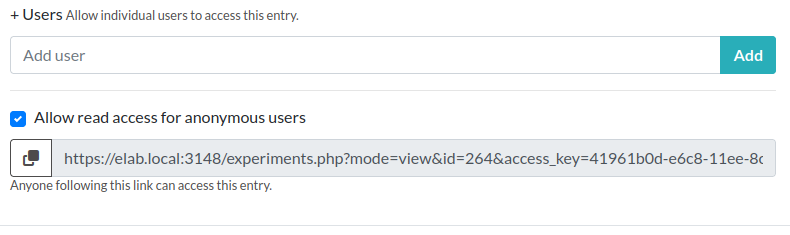
Sharing this link will give read access to the recipient. If the checkbox is unchecked, previously shared links become obsolete. Using this has the advantage that the recipient can follow the evolution of the results over time.

For this feature to work, the instance must be accessible from an external network.

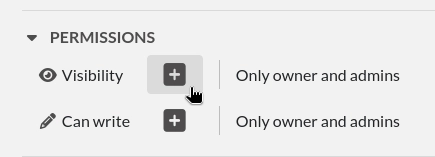
Option 3: Share with a user on the instance

You might want to share some entries with a specific user, group, or team present on the Instance. For that, go to the Permissions section of an entry:

user-permission-view
Permissions for an entry.

Click the + sign to display a modal window. From there you can for instance select a Team to add to the base permissions:

user-permission-view-team
Adding a full team.

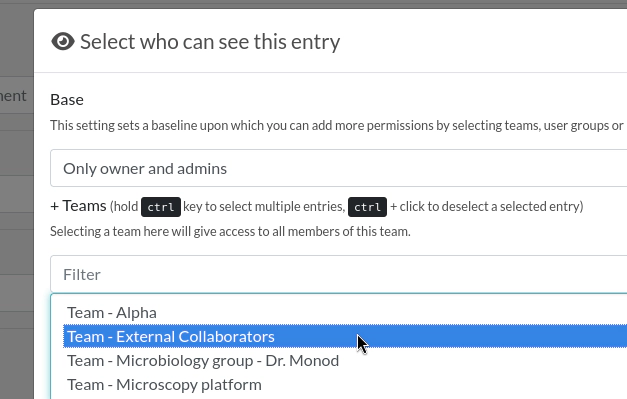
This will add all the members of that Team. If you want to be more precise, you can select a Group, or a single user by typing their name in the section at the bottom:

user-permission-view-user1
Start typing the name of the collaborator.

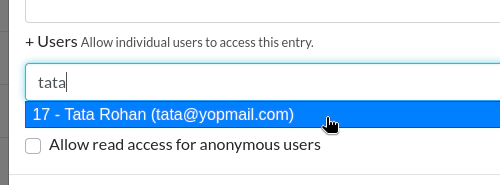
Select the autocompleted user and click "Add".

user-permission-view-user2
Collaborator is now selected.

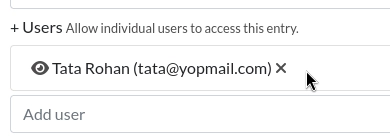
Click "Save" and it will look similar to this now:

user-permission-view-user3
All members of Team "External Collaborators" + Tata Rohan now have access to this entry.

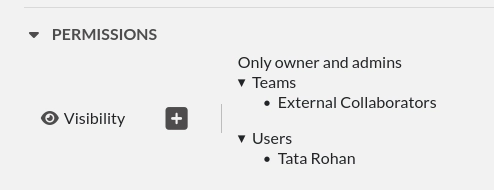
You can also do something similar for edition permissions.