Configure SAML2 authentication

This page describes the steps necessary to setup SAML2 authentication on eLabFTW with an Identity Provider (IdP). Accordingly, this section is meant for users who are already familiar with the process of setting up and running an instance of eLabFTW and the basics of SAML2 authentication.
Setup the Service Provider
The Service Provider (SP) is your eLabFTW instance. First, head to the Sysadmin panel and click the SAML tab.
Debug mode: Set to “Yes”. We want to print errors during the initial setup. Once everything is working, switch this setting back to “No”
Strict mode: Set to “Yes”. Otherwise the mechanism is not secure
Base url: This is the base URL of your SP, _i.e._, the publicly accessible URL of your eLabFTW instance. Example: https://elabftw.example.edu
entityId: The same as the base URL in most cases.
NameIDFormat: match the supported NameIDFormat of the IdP, eLabFTW doesn’t use this but it needs to be specified most of the time. Example values:
x509 certificate: Generate a self-signed certificate and export it in PEM
Private key: the private key corresponding to the certificate
Rollover x509 certificate: Used when the x509 certificate is expiring. Can be set to a new certificate to publish in metadata.
To generate a certificate, you can use this command:
openssl req -newkey rsa:2048 -nodes -keyout private.key -x509 -days 9999 -out cert.crt
Use the content of private.key and cert.crt.
Alternatively you can use this site to generate a self-signed certificate.
Set up the Identity Provider
Option A: using an XML file (recommended)
We recommend that you use a Source XML file to ingest IdP information in eLabFTW. This way, information will be refreshed automatically. It’s also much simpler to set up, as all metadata will be populated automagically.
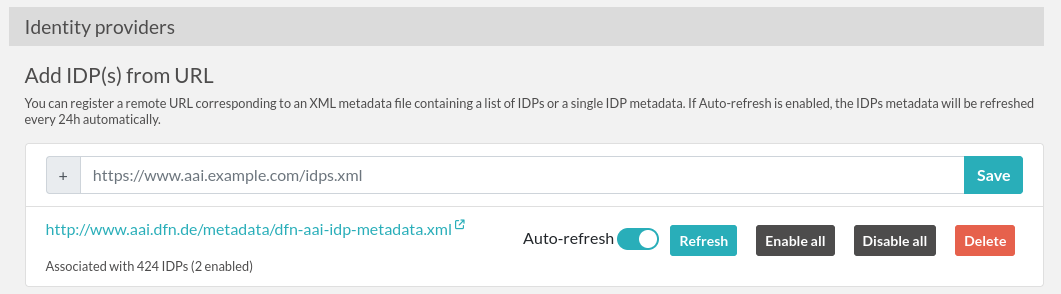
Use a URL pointing to XML metadata for IdPs
Enter the URL into the input field, click the Save button, and then click the Refresh button so that the content is processed and the IdPs are added into the eLabFTW database. The IdPs will be disabled by default, so you will need to enable them manually.
Example metadata URLs:
Here are some IdP metadata listing URLs that you might want to use in your institution:
France: Renater’s federation, use: https://metadata.federation.renater.fr/renater/main/main-idps-renater-metadata.xml.
Germany: DFN AAI federation: https://www.aai.dfn.de/metadata/dfn-aai-idp-metadata.xml
Portugal: RCTSaai exported to eduGAIN: https://registry.rctsaai.pt/rr/signedmetadata/federation/edugain/metadata.xml
Microsoft’s Entra ID, the URL will look like this: https://login.microsoftonline.com/183ad437-6002-47ad-8886-c5185ce9be1a/federationmetadata/2007-06/federationmetadata.xml
Italia: IDEM federation: https://md.idem.garr.it/metadata/idem-metadata-sha256.xml
Netherlands: SurfConext: https://metadata.surfconext.nl/idps-metadata.xml
Switzerland: SwithAAI: https://metadata.aai.switch.ch/metadata.switchaai+idp.xml
Sweden: SWAMID: https://mds.swamid.se/md/swamid-idp.xml
Option B: add IdPs manually
Click the “Add new IDP” button, give it a name and an entityId, and configure the attributes.
Then, from the IdP list, add certificate(s) and endpoint(s).
Attributes for the IdP
We need to specify where to look in the attributes sent in the response for email, team and name of the user. You can use the FriendlyName or the Name from the table below. Note that this will depend on your IdP. You can use the SAML Tracer plugin (see below) to see the response. This will be helpful in determining the fields that you want to use.
Attribute |
FriendlyName |
Name |
Required |
|---|---|---|---|
Yes |
|||
Firstname |
givenName |
No |
|
Lastname |
sn |
No |
|
Userid (internal ID) |
uid |
No |
If you cannot have information about the team, or do not wish to use it, make sure to have the setting “Let user select a team” when the user is created during first login.
Note that the metadata.xml file (accessible at /metadata.php) will contain a section informing the IdP of the requested attributes.
About the Userid / Internal ID
If you configure the uid (Userid/Internal ID) parameter for an IdP, the value will be read from the SAML assertion and:
for user creation on the fly, the
orgid(Organization ID) field of the user will contain the value of theuidattributefor an existing user logging in, the
orgidwill not be modified
If you enable “Fallback to internal id if existing user cannot be matched with email”, then the uid will be used to try and match an existing user if, during login, the match could not be done on the email field (user changed email for instance). You can then chose to enable “If user is matched with internal id, update the email sent by IdP?” so that the email sent by the IdP is updated in the local database.
Disable local login/register
Go to the Server tab of the Sysadmin panel. From there you can disable local login (to force SAML auth) and also disable local registration.
How does it work?
When a user logs in to the IdP, the application searches for an existing account with that user’s email address. If that email address is not found, a new user profile is created in the system. If the user’s team doesn’t exist, a new team is created automatically.
You can configure these behaviors from the Sysconfig panel.
Renewing certificates
What to do when the IdP changes certificates
If the IdP has a Source URL, meaning it was added from an XML file, then the renewal should happen smoothly, especially if the IdP starts advertising the new certificate before using it at least 24 hours before the change.
Otherwise, you can add the new certificate manually by editing the corresponding IdP. You can choose to keep the old cert around if it’s still in use, or delete it if you know it’s not used anymore.
Changing the certificate of the service provider (SP)
From the SAML tab of the Sysconfig panel, in the “Service provider” section, change “x509 Certificate in PEM format” and “x509 Certificate private key”. Make sure your IdPs are aware of the change. If the IdPs are consuming the SP metadata, add the new cert in the specific rollover section so they have a chance to update their metadata. Then set it in the main x509 section along with the corresponding private key to start using it.
Debugging
SAML configuration can be tricky. I recommend that you use the SAML-tracer addon to see the requests and be able to verify what is sent and received.
Looking at the PHP logs will also be helpful to get the complete error message.