Import / Export
Introduction
When users add information into systems like eLabFTW, that information can get trapped in this system. We do not want that. We want information to flow freely.
As such, eLabFTW allows users to freely export and import data, in different file formats, as well as accessing it through a public API, for automation tools.
This page describes the Import and Export features available in eLabFTW.
Importing data
Data import can be used to facilitate ingestion of multiple records into the current system. It can also be a convenient way to transfer data between systems. For instance, a research group leaving an institution can export all their team's data and import it into the new institution.
Import can be done from the web interface, accessible to all users, but also from the Command Line Interface (CLI), which is only accessible to Sysadmins with console access to the container. CLI import is the recommended way to import big files (such as a full team export), as it prevents issues such as timeouts, if the import takes too long.
Two filetypes are currently supported for import: .eln (vnd.eln+zip) and .csv (text/csv).
Importing a .eln archive
You can import data from a .eln archive generated by any ELN software conforming to the specification.
Importing a .eln file created by an eLabFTW instance will produce the best results. This documentation focuses on these.
A .eln can contain any type of data:
- Experiments
- Experiment templates
- Resources
- Resource categories
eLabFTW will pick up the type of each entry through its genre attribute. Alternatively, you can force the type of entry by selecting one from the dropdown menu (web UI) or using the --type option (CLI). The same logic applies to selecting the appropriate category.
Importing through web interface
Head to the "Import" tab of your Profile page by selecting "Import" from the top right menu.
Select a .eln file to display import options. Then click Import.
Importing through CLI
This approach is only available to Sysadmins with shell access.
If you wish to import a rather large .eln archive (such as a full team export), the CLI is the better approach. Display the help with:
docker exec -it -u nginx:nginx elabftw bin/console import:eln -h
As you can see, there are two mandatory arguments, the path to the file, and the Team ID where the import will be performed. The first thing to do is to copy the file in the right place in the container. It must be in /elabftw/exports folder. Copy it with a command similar to this:
docker cp your.eln elabftw:/elabftw/exports/
Figure out the Team ID by looking at the Teams tab from the Sysconfig panel, where the ID will be displayed next to the Team. Next, import your file with:
# import in team 12 and be verbose
docker exec -it -u nginx:nginx elabftw bin/console import:eln -vv your.eln 12
# import in team 25, force everything to be owned by user 5 and be extra verbose
docker exec -it -u nginx:nginx elabftw bin/console import:eln -vvv your.eln 25 --userid 5
# import in team 42, force everything to be of type "Resources" with category "6"
docker exec -it -u nginx:nginx elabftw bin/console import:eln --type items --category 6 your.eln 42
By default (if no --userid setting is provided), the ownership of the items will be
determined by comparing the email addresses of users between the export and import
servers. This allows for simple migration of data from one eLabFTW instance to another,
even if users have differing userid values on the two instances. If the user that owns an item in the exported data is not present on the destination (import) instance, the
import process will create users as necessary.
Importing a .csv file
If you already have some Resources catalogued in an Excel file or File Maker database, you can import them in eLabFTW with a .csv file. A .csv file is a very simple file format. You can save a .xlsx or .ods file into this format. If using Microsoft Office, make sure to select "CSV UTF-8" in the dropdown menu. It needs to be "flat", meaning the first row is the column names, and all subsequent rows correspond to one entry.
To achieve a successful import, make sure to follow these instructions:
- Preparing the file
It is important to make sure that the file you are going to import is "clean". Open your file (.xls/.xlsx/.ods/.csv) in an editor like LibreOffice Calc or Microsoft Excel.
Make sure that there are no empty rows or extra information outside the main data. And that you don't have columns with the same name, or columns with no useful information.
You should have a number of columns and rows, looking something like that:
| Name | Host | Target | Reference | Seller | Storage |
|---|---|---|---|---|---|
| Anti α-actin | Mouse | Human | AB3148 | Abcam | -20°C |
| Anti γ-tubulin | Rabbit | Human | AB1337 | Abcam | +4°C |
| Anti β-actin | Mouse | Human | SC47778 | Santa Cruz | -20°C |
| Anti GAPDH | Rabbit | Human | 2118S | Cell Signaling | -20°C |
| Anti Histone H3 | Rabbit | Human | 4499S | Cell Signaling | +4°C |
| Anti CD4 | Rat | Mouse | 100401 | BioLegend | +4°C |
| Anti GFP | Rabbit | GFP tag | A11122 | Thermo Fisher | -20°C |
| Anti FLAG (M2) | Mouse | FLAG tag | F1804 | Sigma-Aldrich | +4°C |
Now you need to have a column named title. This is the column that will be picked up as the title of the eLabFTW entry once imported. This column doesn't necessarily needs to be the first one, but it needs to be there. Here we're going to change the "Name" column. So now it looks like this:
| title | Host | Target | Reference | Seller | Storage |
|---|---|---|---|---|---|
| Anti α-actin | Mouse | Human | AB3148 | Abcam | -20°C |
| Anti γ-tubulin | Rabbit | Human | AB1337 | Abcam | +4°C |
| Anti β-actin | Mouse | Human | SC47778 | Santa Cruz | -20°C |
| Anti GAPDH | Rabbit | Human | 2118S | Cell Signaling | -20°C |
| Anti Histone H3 | Rabbit | Human | 4499S | Cell Signaling | +4°C |
| Anti CD4 | Rat | Mouse | 100401 | BioLegend | +4°C |
| Anti GFP | Rabbit | GFP tag | A11122 | Thermo Fisher | -20°C |
| Anti FLAG (M2) | Mouse | FLAG tag | F1804 | Sigma-Aldrich | +4°C |
If you wish to include tags during the import, add a tags column and separate multiple tags with a | character. You can also add a metadata column containing valid eLabFTW metadata JSON.
How columns are processed
titlebecomes the entry title and is required.bodybecomes the main text (HTML). To import Markdown, add acontent_typecolumn with the value2(1is HTML).datebecomes the user-defined date. Prefer theYYYY-MM-DDformat.category_titleandstatus_titlebecome the category and status. A missing category or status is created when necessary.metadatais processed as eLabFTW metadata JSON.tagsare added as tags and must be separated by|.locationcreates or reuses a Resource storage path. Separate its levels with/, for exampleBuilding C / Floor 2 / Freezer 4.quantityandunitset the amount stored at the location, for example25andmL.canreadandcanwritecontain permissions in eLabFTW JSON format.rating, when present, must be a value from 0 to 5.
All other columns are imported as Custom Fields. Values that are valid URLs are created as URL fields; other values are created as Text fields.
Once you are satisfied with the file, export it as a UTF-8 .csv file. Make a second file containing only the header and two or three rows, and use that smaller file to test the import first.
Importing the file through the web interface
Select Import from the user menu to open the Import tab of your Profile page, then select your test CSV file.
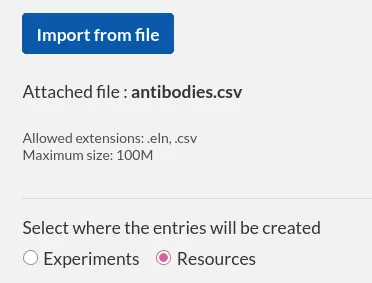
Choose whether each row will create an Experiment or a Resource. Select the destination category, owner (available to administrators), and read and write permissions as appropriate.
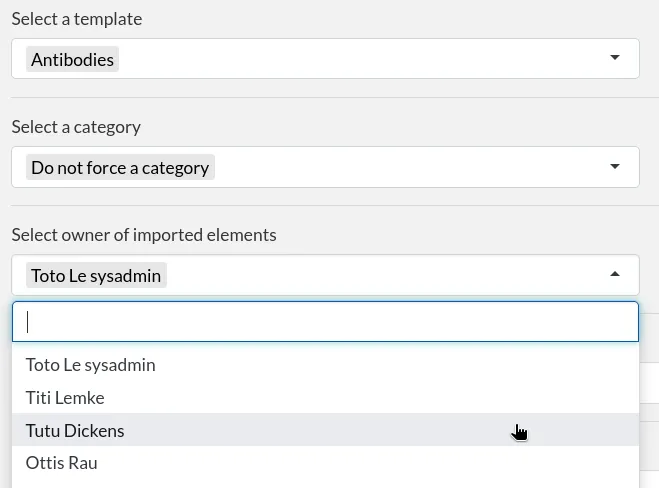
Using an Experiment or Resource template
For Experiment and Resource imports, you can select an existing template. Choose Do not use a template to create entries directly from the CSV, or select a template to use its structure and defaults for every imported row.
When a template is selected:
- each row creates a new entry from that template;
- the CSV
title, tags, Resource location, and metadata values are applied to the new entry; - a Custom Field whose name matches a template field keeps the template field's type and configuration while receiving the imported value;
- a non-reserved CSV column that does not match a template field is added as a new Custom Field;
- imported values missing from a Select, Select one, Radio, or Select multiple field's choices are added to the available choices.
If the CSV contains both a metadata JSON column and individual columns matching the same Custom Fields, eLabFTW merges both into the template metadata. The individual CSV columns are applied last and therefore take precedence for matching fields.
Test with two or three rows before importing the complete file. Check the resulting Custom Field types, choice lists, tags, and Resource locations. If the result is correct, delete the test entries and import the complete CSV.
Click Import. Every CSV row creates one entry. The import reports an error if a row cannot be processed.
Using the API to control how things are imported
If you want to have complete control over the import process, you can use a few lines of python to do the import. Follow our tutorial to import data from spreadsheet files.
Importing compounds through CLI (csv file)
This approach is only available to Sysadmins with shell access.
If you're working with a large database of compounds, using the CLI is a more efficient approach. Display the help with:
docker exec -it elabftw bin/console import:compounds -h
The file must be available inside the container at /elabftw/exports. Use the following to copy your file into the container:
docker cp your_compounds.csv elabftw:/elabftw/exports/
Figure out the Team ID by looking at the Teams tab from the Sysconfig panel, where the ID will be displayed next to the Team. Next, import your file with:
# import in team 2 and be verbose
docker exec -it elabftw bin/console import:compounds -vv your_compounds.csv 2
# import in team 25, force everything to be owned by user 5 and be extra verbose
docker exec -it elabftw bin/console import:compounds -vvv your_compounds.csv 25 --userid 5
Preparing the CSV file for import
One thing to know, is that the import command has an option (-p) to match compounds with PubChem, through the CAS or PubChem CID. So a .csv file with a single column cas or pubchemcid is enough to import compounds in eLabFTW.
When importing, there is an option to automatically create a Resource for each imported Compound. The Resource will be linked to the Compound, and its title will be the Compound name. For this, simply provide the Resource Category ID with the -c flag.
To also import locations/containers with quantity and units, use columns:
location: as a/separated value. For example: "Building C / Floor 2 / Chemistry room". Note that it is possible to specify another separator, which might be useful if your existing data is using another character than/.quantity: this should be a number corresponding to the quantity stored at the locationunit: this should be a value such as μg, mg, g, kg, mL, L
Other columns such as inchi, smiles, molecularweight, molecularformula will also match and be imported to the compound.
Supported CSV columns: cas, chebi_id, chembl_id, dea_number, drugbank_id, dsstox_id, ec_number, hmdb_id, inchi, inchikey, iupacname, is_antibiotic, is_antibiotic_precursor, is_cmr, is_controlled, is_corrosive, is_drug, is_drug_precursor, is_explosive, is_explosive_precursor, is_flammable, is_gas_under_pressure, is_hazardous2env, is_hazardous2health, is_nano, is_oxidising, is_radioactive, is_serious_health_hazard, is_toxic, is_ed2health, is_ed2env, is_pbt, is_pmt, is_vpvb, is_vpvm, kegg_id, metabolomics_wb_id, molecularformula, molecularweight, name, nci_code, nikkaji_number, pharmgkb_id, pharos_ligand_id, pubchemcid, rxcui, smiles, unii, wikidata, wikipedia.
Once you have your CSV file ready, send it to your Sysadmin and let them know if it should be imported with PubChem and if you want to create Resources, too.
Matching an existing database
Maybe you already have a Resource Category: "Chemical compounds" for instance, with Compounds associated to a "CAS" custom field. And you'd like to import the already existing compounds in the Compounds table in eLab so they exist as proper compounds.
To do that, the import should be done with the --match-with command option, which will match an existing Resource through its custom field value. For example: --match-with cas will import the compound and link it to the Resource where a custom field cas has the same value as the row from the column cas in the .csv.
Exporting data
Exporting through web interface
The Export tab from your Profile allows full export of all your data, in several formats. Click "Create new export" to configure how you want the data to be exported. A "File is not ready" entry will be displayed. Wait a few seconds and click "Refresh". Once you see a link to the file, you can click it and download the exported file.
Very long exports will still be processed if you close your browser or navigate away.
Note to Sysadmins: on a given instance, export jobs are processed only one at a time. Users can each keep only 6 exported files. They are stored in exports within the elabFTW root folder. The exports folder may be mapped to a path outside the container to prevent exceeding the disk usage quota of the container.
This can be done by adding a corresponding entry to /etc/elabftw.yml beneath the existing mapping for the upload path. In the example below, the exports folder is mapped to /var/elabftw/exports.
volumes:
    # this is where you will keep the uploaded files persistently
    # for Windows users it might look like this
    # - D:\Users\Nico\elab-data\web:/elabftw/uploads
    # host:container
    - /var/elabftw/web:/elabftw/uploads
    # mapping of exports folder
    - /var/elabftw/exports:/elabftw/exports
Exporting through CLI
As a Sysadmin with shell access, you can export an entire team, which can be useful if that team migrates out of your instance for instance. Use bin/console export:eln -h. The only argument is the team ID that you wish to export.
It will export everything into a .eln file, that you need to copy out of the container. This file can later be re-imported on another instance.
Important note: Import/Export is only supported between instances of the same version, preferably the latest version!
Third-party tools
elAPI
The University Computing Centre (URZ, FIRE division) of University of Heidelberg developed a command line tool elAPI to facilitate some operations. Have a look: https://github.com/uhd-urz/elAPI/.
elAPI Plugins
The CRC 1638 at the Heidelberg University Biochemistry Center (BZH) built a tool on top of elAPI to facilitate import/export actions. Have a look: https://github.com/sfb1638/elAPI_Plugins.